How to create a simple Chrome extension


In this post, I will explain to you how to create your first Chrome extension. But first, what is a Chrome extension? It is a small program that provides additional functionality to the Google Chrome browser. Basically, it can enhance or modify the browsing experience such as blocking ads, improving productivity, enhancing security, or integrating with other web services. You can install extensions from the Chrome Web Store, and once installed, they typically appear as icons or buttons within the browser interface.
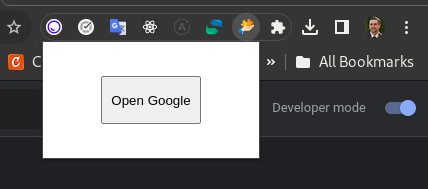
We're going to develop an extension that has a simple popup with the button "Open Google". When you click this button, Chrome will open a new tab and load the google.com search site. It will be something like this:
Use this knowledge you create more complex extensions in the future. Also, make sure you have a basic knowledge of HTML, CSS, and JavaScript, installed Chrome web browser and Visual Studio code text editor. Of course, you can use any text editor that you prefer.
Step 1: Create a directory
Create a directory (folder) for your extension. It will contain all the files. Name it something descriptive, like "open-google-extension".
Step 2: Create Manifest File
The manifest file, manifest.json, is a main component of a Chrome extension. It defines various properties of an extension, such as its name, version, description, permissions, and other important details. Open your text editor, create a file with the name manifest.json, and put this content:
1{
2  "manifest_version": 3,
3  "name": "Open Google Extension",
4  "version": "1.0.0",
5  "description": "Easy open the Google search",
6  "action": {
7    "default_title": "Open Google Extension",
8    "default_popup": "popup.html",
9    "default_icon": {
10      "16": "images/icon16.png",
11      "48": "images/icon48.png",
12      "128": "images/icon128.png"
13    }
14  },
15  "icons": {
16    "16": "images/icon16.png",
17    "48": "images/icon48.png",
18    "128": "images/icon128.png"
19  }
20}
Before moving further, I would like to provide you with a description of the manifest's content. Let's break down the key components:
manifest_version(3): Indicates the version of the manifest file format. In this case, it's version 3, which is the latest version that was updated in January 2022;Don't use the manifest version 2, because it is deprecated and will be removed from Chrome in 2023. See https://developer.chrome.com/blog/mv2-transition/ for more details.name("Open Google Extension"): Specifies the name of the extension. In our case, it's named "Open Google Extension";version("1.0.0"): Specifies the version number of the extension. You should increment this number when releasing updates to the extension;description("Easy open the Google search"): Provides a brief description of the extension. In this case, it mentions that the extension makes it easy to open Google search;action: Defines the extension's behavior for the extension icon in the browser toolbar:default_popup: Specifies the HTML filepopup.htmlthat will be displayed when you click the extension icon;default_icon: Specifies the default icons of different sizes (16x16, 48x48, and 128x128 pixels) that represent the extension in the browser toolbar.
The extension default icon icons: Specifies the icons for the extension in different sizes (16x16, 48x48, and 128x128 pixels). These icons are used in various places, such as the Chrome extension management page.
Step 3: Create an image directory
Create a directory images, where you will store the icons for the extension. And make some icons with sizes of 16x16, 48x48, and 128x128 pixels and put it to images. If you don't want to create your own icons, you can download my icons from here.
Step 4: Create a PopUp HTML file
The Popup HTML file is a specific HTML file that defines the user interface of the pop-up window. As our extension is simple, the pop-up contains a button labeled "Open Google" which, when clicked, opens the Google website in a new tab.
Open your text editor and create a file with the name popup.html. Then, write this one:
1<!DOCTYPE html>
2<html lang="en">
3  <head>
4    <meta charset="UTF-8" />
5    <meta name="viewport" content="width=device-width, initial-scale=1" />
6    <title>Open Google Extension</title>
7    <style>
8      div.modal {
9        width: 200px;
10        height: 100px;
11        display: flex;
12        justify-content: center;
13        align-items: center;
14      }
15      button {
16        width: 100px;
17        height: 48px;
18        cursor: pointer;
19      }
20    </style>
21  </head>
22  <body>
23    <div class="modal">
24      <a href="https://google.com" target="_blank">
25        <button>Open Google</button>
26      </a>
27    </div>
28  </body>
29</html>
The next step is loading the extension to the Chrome browser.
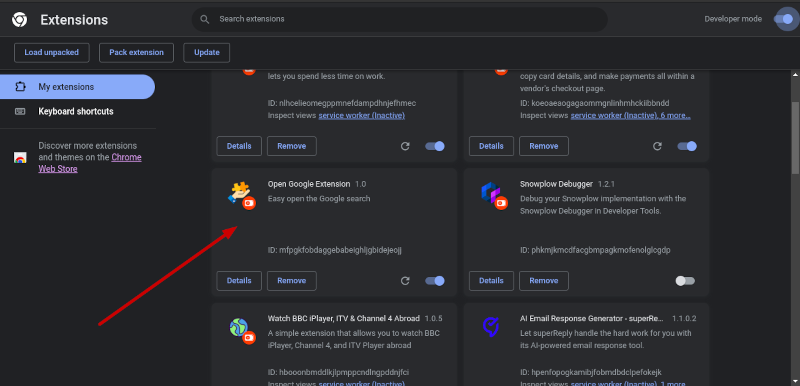
Step 5: Load Your Extension
- Open Google Chrome and go to the Extensions page. You can do this by typing
chrome://extensions/in the address bar or navigating through the Chrome menu (Tools>Extensions>Manage Extensions);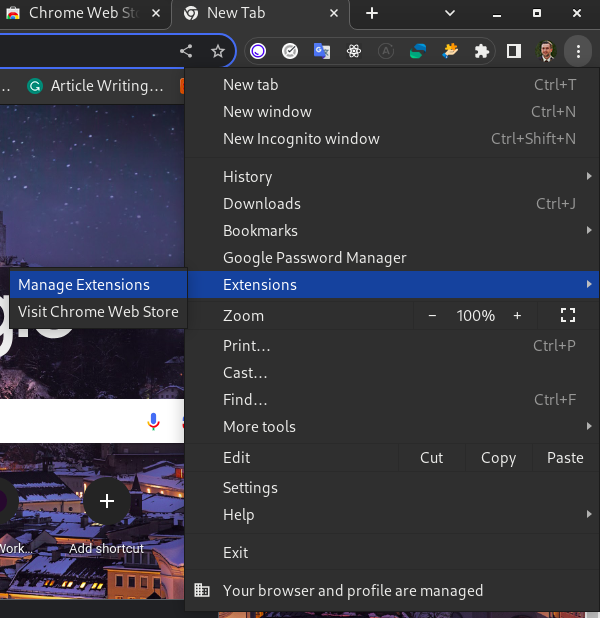
- Enable Developer mode by toggling the switch in the top right corner;
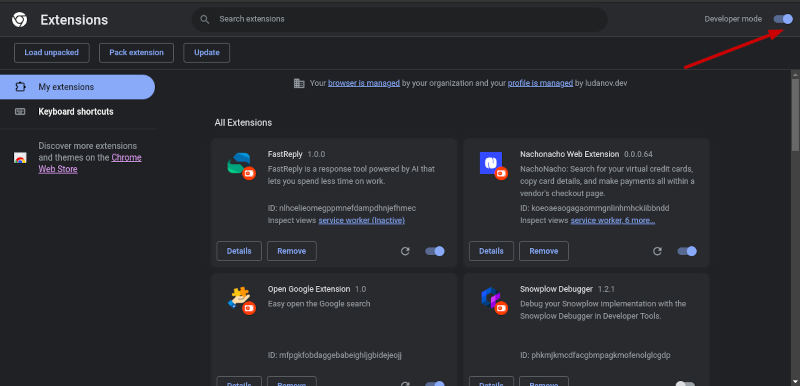
- Once Developer mode is enabled, you'll see additional options, including "Load unpacked." Click on the "Load unpacked" button;
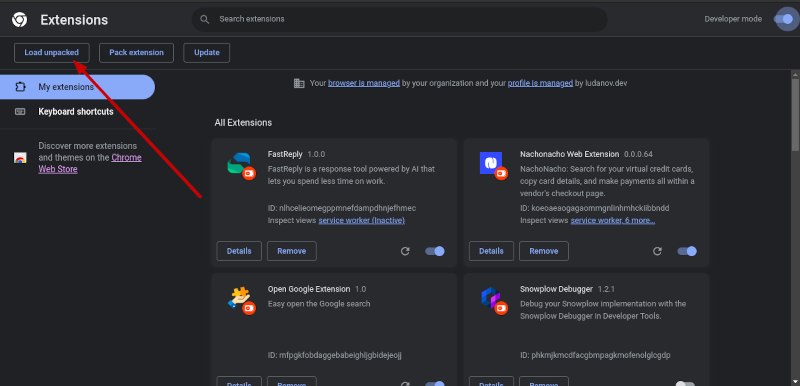
- A file dialog will open. Navigate to the folder where your extension files (including
manifest.json) are located, and select the folder; - Click the "Select Folder" button or equivalent to confirm. Your extension should now be loaded and visible on the Extensions page.
Step 6: Test Your Extension
Test your extension by interacting with it as you normally would. Click the extension icon (icon in the toolbar) and ensure it behaves as expected.
Congratulations! You've just created your first Chrome extension. With this foundation, you can explore more complex functionalities, interact with web pages, and tailor your browsing experience to your liking.